Xbox L3 Button Problems? Fixes, Tips & More!
Is your digital warrior faltering in the heat of battle? A malfunctioning Xbox controller, particularly the elusive L3 button, can turn a triumphant victory into a frustrating defeat. Fear not, for solutions exist to resurrect your trusty gamepad and restore your gaming glory.
The frustration of a sticky, unresponsive, or completely dead L3 button (or left stick button as it's often known on Xbox) is a common lament among gamers. Whether you're playing on an Xbox One, Xbox Series X, or even a legacy Xbox 360, controller issues can arise. While the L3 button isn't explicitly labeled as such on Xbox controllers (it's the left stick when pressed down), its functionality is crucial for many in-game actions, such as sprinting, crouching, or performing other specific maneuvers. This article will explore potential causes and offer practical solutions to get your controller back in fighting shape, helping you navigate the digital landscapes with precision and control.
| Topic | Details |
|---|---|
| Controller Issue | Unresponsive or malfunctioning L3 button (Left Stick button) on Xbox Controllers |
| Affected Consoles | Xbox One, Xbox Series X, Xbox 360 |
| Common Causes | Dust and debris, firmware issues, hardware problems |
| Initial Troubleshooting Steps | Power cycle console, check controller firmware, clean the controller |
| Advanced Troubleshooting | Disassembly for deep cleaning, professional repair |
| Additional Resources | Xbox Support |
Before delving into complex repairs, start with the basics. Sometimes, the simplest solutions are the most effective. Begin by power cycling your Xbox console. A simple restart can resolve minor software glitches that might be interfering with controller functionality. Turn off the console completely by holding down the power button for approximately ten seconds until it shuts down. Once off, unplug the power cord from the back of the console and wait about a minute before plugging it back in and powering the system on. This hard reset can clear temporary files and refresh the system's connection with the controller.
Next, ensure your Xbox controller's firmware is up to date. Outdated firmware can lead to compatibility issues and erratic button behavior. To check and update your controller's firmware: Press the Xbox button on your controller to open the guide. Navigate to "Profile & System > Settings > Devices & Streaming > Accessories." Select the controller you wish to update. On the "Xbox Wireless Controller" screen, look for an option to check the firmware version. If an update is available, follow the on-screen instructions to install it. A stable internet connection and a USB cable are recommended for a smooth and reliable update process. Always use a USB cable for a stable connection during firmware updates.
Dust, debris, and grime are notorious enemies of electronic devices. Over time, these contaminants can accumulate around the buttons and analog sticks, hindering their proper function. The L3 button, being a mechanical component, is particularly susceptible to such interference. To clean your controller, use a soft, lint-free cloth slightly dampened with isopropyl alcohol. Gently wipe around the L3 button, paying close attention to any visible dirt or residue. Avoid using excessive liquid, as it could seep into the controller's internal components and cause damage. For more stubborn grime, consider using compressed air to dislodge particles from hard-to-reach areas.
If the above steps fail to resolve the issue, a more in-depth cleaning might be necessary. This involves disassembling the controller to access and clean the internal components of the L3 button mechanism. However, proceed with caution, as disassembling your controller can void your warranty and potentially cause further damage if not done correctly. Before attempting this, familiarize yourself with the process by watching instructional videos or consulting online guides. Ensure you have the necessary tools, such as a precision screwdriver set, a plastic opening tool (spudger), and a clean workspace.
To disassemble an Xbox One controller (the process is similar for other Xbox controller models, but always check for specific instructions for your model): First, power off your controller and remove the batteries. Then, carefully grip the controller firmly to remove the side handles. Wedge a spudger into the seam between the front and handle plates and gently pry the side plate away from the front plate by moving the spudger back and forth. Repeat this process for the other side. Once the side handles are removed, you will have access to the screws holding the controller together. Unscrew these screws and carefully separate the front and back plates. With the controller disassembled, locate the L3 button mechanism. Use a soft brush or compressed air to remove any dust or debris. If necessary, gently clean the button contacts with a cotton swab dipped in isopropyl alcohol. Once clean, reassemble the controller, ensuring all components are properly aligned and secured.
Sometimes, the issue isn't dirt or debris but rather a physical defect or wear and tear of the L3 button mechanism. Over time, the button's internal components can degrade, leading to reduced responsiveness or complete failure. If you suspect a hardware issue, consider seeking professional repair services. Many electronics repair shops specialize in controller repairs and can replace faulty buttons or other components. This is often a more reliable option than attempting to repair the controller yourself, especially if you lack the necessary skills and experience. While the Xbox One controllers R3 button is the default home button for the console, the function of L3/R3 can vary between games and even PlayStation controllers where it allows access to the menu.
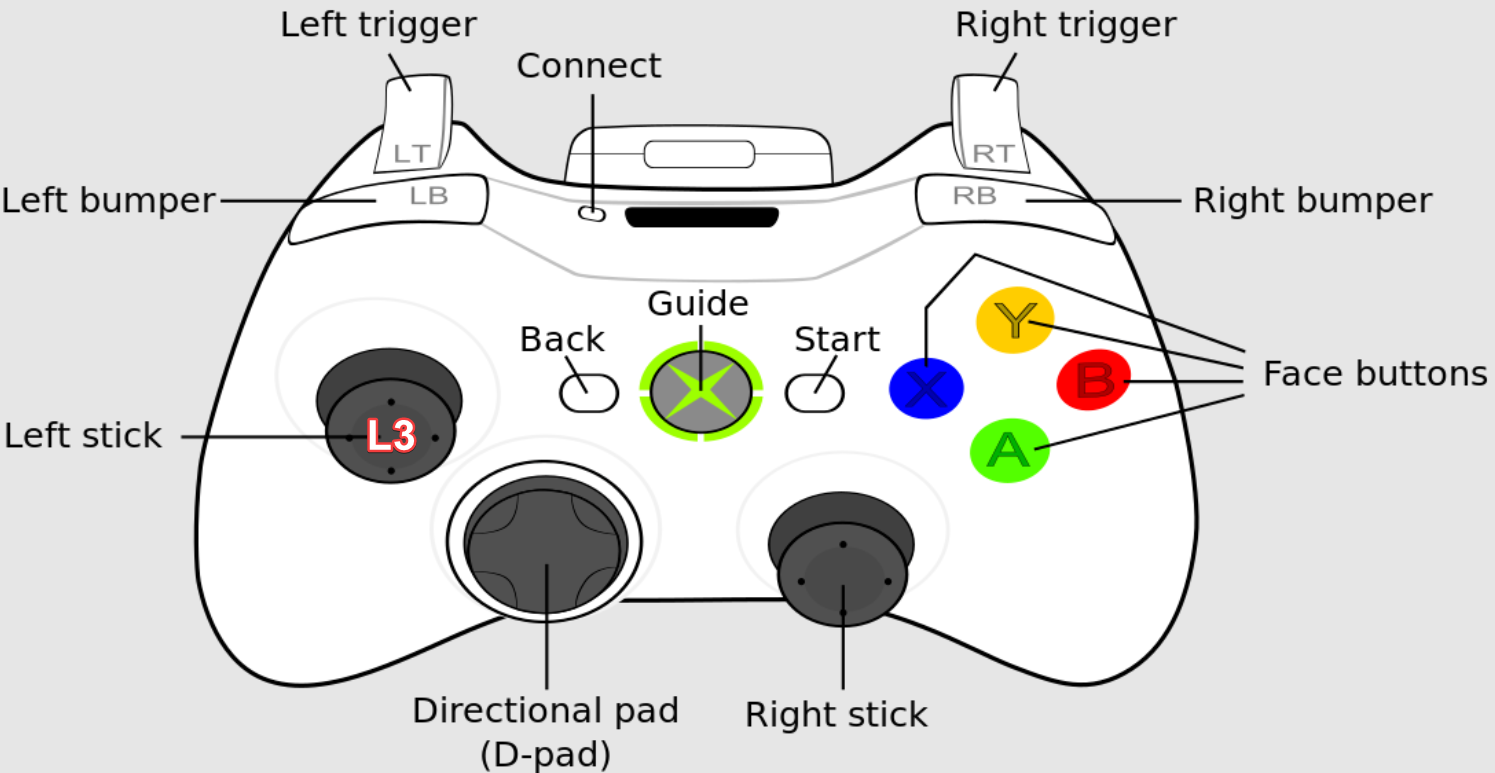
The terms "L3" and "R3" refer to the left and right analog stick buttons, respectively. On PlayStation controllers, these buttons are clearly defined and labeled. However, on Xbox controllers, the same functionality exists, but it's typically referred to as pressing down on the left or right analog stick. In other words, pressing down on the left analog stick activates the L3 button function, while pressing down on the right analog stick activates the R3 button function. These buttons are commonly used for various in-game actions, such as sprinting, crouching, zooming, or performing special attacks. Remember theres no physical L3 label on an Xbox One controller, but the left stick (LS) can be clicked or pressed as an input in many games, similar to how L3 is used on PlayStation controllers. The location of the Xbox L3 and R3 buttons are on the front of the controller, near the A and B buttons.
Firmware glitches can sometimes manifest as unresponsive buttons. To address this, ensure your controller is connected to your Xbox console using a USB cable. This ensures a stable and reliable connection during the firmware update process. Once connected, navigate to the "Accessories" app on your Xbox console and check for any available firmware updates for your controller. Install any updates that are available, following the on-screen instructions. After the update is complete, restart your console and test the L3 button functionality. This process will restore the functionality of your controller's buttons, providing a smoother gaming experience.
Before diving into any repair procedures, always ensure your Xbox One controller is powered off. This prevents accidental electrical shocks or damage to the controller's internal components. Remove the batteries or disconnect the USB cable before disassembling the controller or attempting any cleaning procedures. Dust and debris can interfere with the L3 mechanism and cause the L3 button to not respond consistently. If your L3 button doesnt register clicks reliably, dust and debris can interfere with the L3 mechanism. The term L3 on an Xbox One S controller refers to the left analog stick button, which is one of the buttons you can press down on the left analog stick.
If you're experiencing issues with sprinting or other functions assigned to the L3/R3 buttons on your Xbox One controller, you might want to consider addressing any potential gaps between the stick and the tact button. In some cases, a small gap can develop over time, leading to inconsistent button presses. While there is a general "button 3" on the Xbox controller, this isn't a specific universally assigned button. What button is 3 on Xbox? This button is just to the lower left of the Xbox button. The buttons functions vary depending on the app or game.
Grip the controller firmly to remove the side handles, wedging a spudger into the seam between the front and handle plates. Pry the side plate away from the front plate by moving the spudger back and forth. Once clean, place the button caps back and ensure they fit snugly. This port is on the top edge of the controller above the Xbox button.
The original Xbox controller (aka the Duke) released in 2001 with the first Xbox console was large, bulky, and wired. The Xbox 360 controller released in 2005 with the Xbox 360 has wireless capability and was smaller and more ergonomic than its predecessor. The Xbox One controller launched in 2013 with the Xbox One.
In conclusion, resolving an unresponsive L3 button on your Xbox controller requires a systematic approach, starting with basic troubleshooting steps and progressing to more advanced solutions. By following the guidelines outlined in this article, you can diagnose the problem, implement the appropriate fix, and restore your controller to its optimal functionality, ensuring a seamless and enjoyable gaming experience. If some or all of the buttons on your Xbox controller arent working properly (this could include joystick drift, awkward calibration, button mapping issues, or controls not responding as expected), try these solutions to correct the problem. By following this guide, you'll be able to disassemble your Xbox One controller, access the buttons, and clean them thoroughly.
What is L3 Button on your Xbox Controller?

What is L3 Button on your Xbox Controller?
Xbox Controller L3 Button Guide & Fixes
